

I’m sure that I am not the only person who puts things by my door so I don’t forget to take them with me. It is just too easy to forget things, unless I ensure that my future self will literally trip over whatever it is that needs to be done. Whether you use Nonprofit Cloud or Education Cloud, you can (and should!) do the same thing with your Salesforce instance. Creating and maintaining detailed design documents is important, but it’s also vital to take the time to provide yourself, your fellow admins, and your users with notes they will see the moment they need to.
Below are some tips on where and how to insert this documentation.
Do your future self a favor: document where you’ll see it!
Help Text
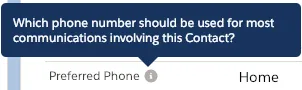
This text shows up for any end user that mouses over the “i” (or the “?” in Classic) next to a field.
Keep in mind that you can update Help Text for all fields, including those inside of managed packages or standard fields. It’s also a fun exercise to trim down your text to fit into the 255 character limit. In the screenshot below, you will notice that the Help Text clearly explains to users what the field does and how it should be used, all in 255 characters.
Descriptions
The Description should provide more detailed information than the Help Text. Thankfully, you get 1,000 characters to do so. Help Text should say what a field does, while the Description should say how it does it; this may include notes about which teams / departments use the field, and how it’s included in automations. For fields that are updated from an external system, you should also include key details about the integration process. In the screenshot below, you will notice that the description even has a note about what changes to the business process might allow the field to be totally removed. Of course, it would be great to be able to have a Chatter thread (yes, I’m shamelessly promoting an idea I had four years ago…) around setup items, but for now, the Description field will do.
Inline Comments
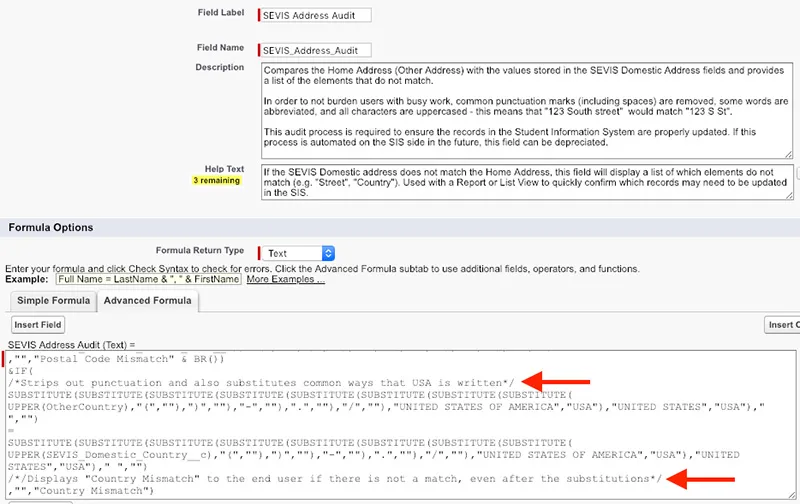
If you’ve spent any time looking at good Apex code, you will have seen that developers provide inline comments to explain how their code works. This is a great example from the Education Data Architecture, or EDA (formerly HEDA) team. You can also use inline comments in Formula Fields, Workflow Rules, Field Updates, Validation Rules, Process Builder formulas, Predefined Field Values, and anywhere else you are typing out formulaic logic.
In the screenshot above, the inline comments (highlighted with red arrows) will remind an admin why the SUBSTITUTE function is used, as well as what the outcome of the IF statement should be. Simply sandwich your comment between a forward slash followed by an asterisk and asterisk followed by a forward slash, like this: /* Comments are very helpful! */
Keep in mind that you can also refer to outside documentation within your comments. Linking out to more detailed documentation, or even diagram that shows how your automation works will be very helpful down the road.
Field Labels + Help Text
This final tip may come as a surprise to veteran admins, but it does help to address a challenge you will encounter with standard fields and managed packages. As a good admin, I’m sure you are already hiding unused standard or managed package fields from your end users, ensuring they don’t encounter them when building a report or list view. Updating Field Labels by simply appending “(not used)” will help you remember which fields you aren’t using, and will also communicate this quickly to your fellow admins. In addition, if an end user does have access to the field, it will be clear in the UI that it’s not used. You may also prefer to use a prefix, like X_, “DNU_” (do not use), or “ZZZ_” (will sort to the bottom when you order alphabetically).
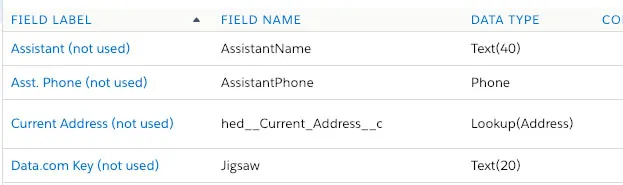
You can see in the screenshot above that in this particular org, we’re not using the standard fields related to an Assistant or the Data.com Key. In addition, we’re not taking advantage of Current Address field from the EDA managed package.
This label change makes it immediately clear, and updated Help Text provides more context. For example, the Help Text for the Current Address field reads: “This field is part of EDA’s address management, which is not used. If a use case for address management within Salesforce is identified in the future, this field will need to be relabeled and access restored to end users.”
There are two techniques for doing this. For standard fields, use the “Rename Tabs and Labels” feature (Setup > User Interface > Rename Tabs and Labels). Just click Edit next to the standard object that contains the field in question, and then click Next to see a list of all the fields.
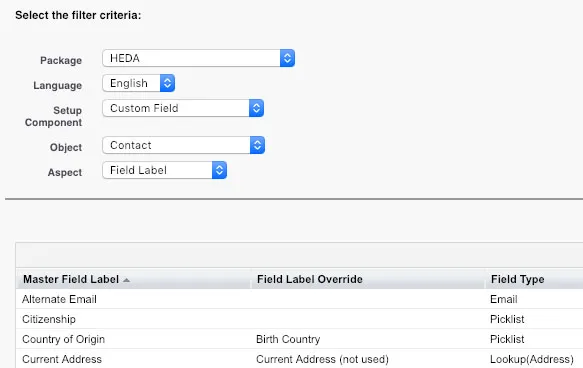
For fields that are part of a managed package, you will need to use the Translation Workbench Override (Setup > User Interface > Translation Workbench > Override). The screenshot below shows some of the overrides that were set on the Contact custom fields that were delivered with EDA. Country of Origin was relabeled to more accurately reflect how it’s being used in this Org, while Current Address was tagged as not used.
Taking the time to document will absolutely be worth the effort, but that’s not to say it’s easy or will happen without discipline. It’s a good idea to reward yourself; with all the help you are providing your future self, it’s only fair that they buy you a drink!