


Successfully importing data using the NPSP Data Import Tool is a challenge for many nonprofit customers, especially crafting your files and deciphering all of the column headers in the import template. Here are some suggestions to simplify the data import process. The following NPSP data import suggestions are based on my experience working in technical support, where I worked on over a thousand data import support cases, and also a few hundred pro bono projects.
Set up data imports one step at a time
While some documentation may advise you to import everything all at once, I recommend breaking up your data into four smaller imports. To set yourself up for success, organize the data in a way to make it as easy as possible to see (and fix) bad data.
The reason is, you want to be able to see and catch any issues in the data quickly and easily.
Remember, you are going to spend 99.9% of your time in your CSV checking the data and making sure it’s pristine, so why not make it as easy on yourself as possible?
Some may say you are making four times the work for yourself by making four files instead of just one, but the advantages far outweigh the disadvantages, so let’s take a look at what the four files are and why.
Create 4 files to improve your data imports
I recommend using the following four files to improve your data import:
- Organization Accounts without Donations
- Household Accounts without Donations
- Organizations with Donations
- Household Accounts with Donations
Why? It is much easier to catch any inconsistencies when dealing with fewer columns, as well as to catch any mistakes in the data itself.
For example, when you are importing “Organization Accounts without Donations,” your CSV would be a total of eight columns before adding any custom field columns.
By having a streamlined CSV file, it makes it easier for you to check for things like:
- Did Excel remove that leading zero in a ZIP code? 08408 can become 8408 if you’re not careful.
- Are all of your U.S. states upper case, or do you have a mixture of uppercase and lowercase state names?
- What about your country? Was there an abbreviation used or was it spelled out?
- Are phone columns uniformly formatted?
Being able to quickly see these kinds of issues is one of the reasons for breaking the import into four easily managed files.
Another example is when importing “Household Accounts with Donations.” Perhaps you want to assign “Hard Credit” to Contact2? If you are using the Master Template, you would not be able to do that since when importing donations the “Donation Donor” can only be “Contact1.“ By creating a separate Donation Template, each individual becomes ”Contact1“ no matter if they are the Primary Contact or just a member of the household. So now that the system see’s them as ”Contact1,“ you can easily assign Hard Credit to any individual. This can be a huge advantage when you are doing a data migration from an older or legacy system.
Tips and tricks: date fields, currency symbols and preferred columns in data imports
Are your date fields all set up the same? Watch out for this in your import. Date fields should to be formatted with two digits in each field, or 2/2/2. For example 01/01/19.
In Excel v 16.16.10 and higher, it has this format available, but if you are working in an older version of Excel, I would suggest using your spreadsheet to do the initial formatting, then select the entire column, then copy the column and paste it into a text editor.
Then in Excel, format the column to “text.” At this point, your dates will disappear. Now select and copy the column you pasted into the text editor, and now paste it back into your column in Excel. Doing this procedure prevents Excel from changing the Date format.
Another common issue I’ve seen is that the Amount column should be formatted as a number with two decimal places, but with no currency symbols. People see Amount and think it needs a currency symbol, but the system will error out if your values have one. This means: if you add a currency symbol to the “any amount” value in the donation amount column, when you do the import, it will fail for each record that has the currency symbol.
Also, one of the most confusing things when importing data comes from the “Preferred” columns.
For the NPSP Data Import Process, the “Preferred” columns represents “home” or “work” not an actual email or phone number.
The “Preferred“ columns tell the system which is the primary value for either Email or Phone, just as Donation Donor will either be Account1 or Contact1 and not an actual name of the organization account or name of the donor/contact.
If you happen to be importing a household with more than two donors or Contacts, then you’ll need to pay close attention to the primary contact entries so that only the matching criteria is listed for the 3rd or 4th member of the household.
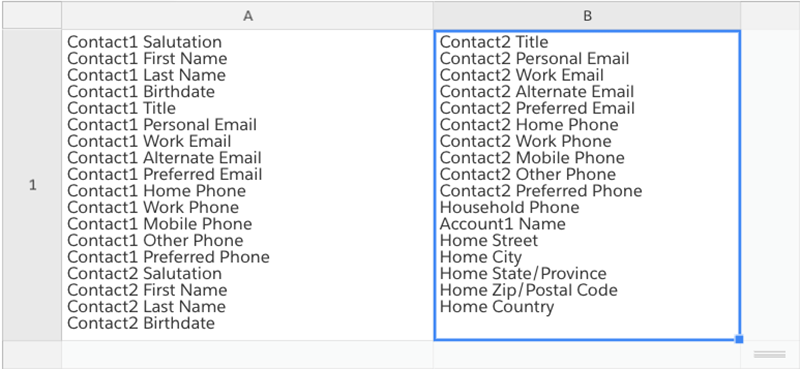
Here’s an example with multiple household members:

As you can see, row 2 is the household data. This will include all biographical information for both Contact1 and Contact2, including address information for the household.
If you also want to import other members of the household, you should down-fill. In Excel, go to Edit >> Fill >> Down or repeat only the matching data you have specified in the NPSP import tool. This will either be first/last/email or first/last/phone.
In this example, I am using first/last/email. Remember, it is best to have three data points when matching records. By having three data points, i.e. first/last/email or first/last/phone, you force the system to assign the donation or household members to the only record that matches all three data points.
In row three in the above screenshot, there is the first/last/email info for Contact1, the primary contact, and nothing else. This is the matching information that the NPSP Data Import Tool uses to match against existing records. In this row there will be no other emails or phone numbers for Contact1/The Primary Contact. Only the matching information.
Then add all the biographical information for the new contact 2—which is really your third member of the household. You can repeat this for as many members of the household as needed.
Key information to put in four files for data imports
Okay, we’ve talked about formatting and we’ve talked about matching information and Donation Donor, let’s see what’s in these four files that makes them easy to use.
NOTE: All of these column headers are derived from the NPSP Data Importer Template, a.k.a. the Master Template.
Something people ask all the time is: “Do I really need to delete the empty columns?” The quick answer is no, you can leave them there, and it will not do any harm or cause any issues with the import.
But my recommendation is: if you do not have any data for a column, DELETE the column.
This helps your file to be as clean as possible. It’s okay to leave the column in the file, but again, you want your file to be clutter-free. This helps achieve the goal of making your file as streamlined as you can to visually see bad data. The empty column could distract you.
Remember, everything within the tables below are Column Headers.
Creating four templates for better data imports
Open up the Master Template. The first template to create is “Organization Accounts Without Donations.”
Next, scroll to the right until you get to the Account1 section.
Now select these column headers:
- Account1 Name
- Account1 Street
- Account1 City
- Account1 State/Province
- Account1 Zip/Postal Code
- Account1 Country
- Account1 Phone
- Account1 Website
Paste them into a new workbook in Excel, and save the file as a CSV:

The next template to create would be the “Household Accounts without Donations.” Follow the same procedure as for the previous one in “Organization Accounts Without Donations.” So in the Master Template, scroll to the left and copy all of these column headers:
Paste them into a new workbook, and then save it as a CSV.
For this template, the “Account1 Name” column allows you to create an affiliation record to an organization account by just entering the NAME of the organization account.
If you do not import the data in the order that’s laid out in the template (Organizations first), you could accidentally create duplicate Organization accounts. This is because the NPSP Data Import Process will create an Organization Account if it does not find an account to match against, if you have a value in this column.
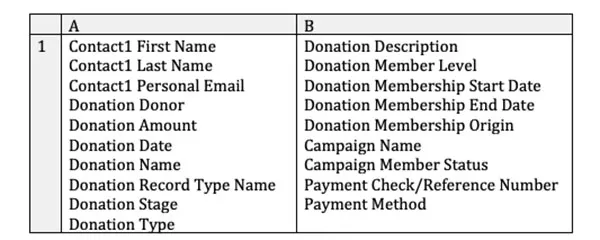
The next template to create would be the “Organizations with Donations.” Again, follow the same procedure. In the Master Template, scroll to the right and copy all donation column headers:
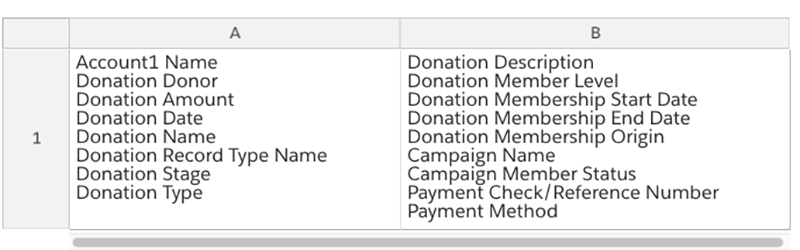
Then paste them into a new workbook. Insert a column to the left of the donation columns you just pasted and insert “Account1 Name.”
In this template, Donation Donor is “Account1.” The Donation Donor column tells the system whom to match the donation to. It’s not the name of an account or person.
When importing donations, there are some columns that you may not need. Remember, you want your import file to be as clean as possible.
- Account1 Name – required
- Donation Donor – Account1
- Donation Amount – required
- Donation Date – required
- Donation Name – you only need to input any value if you are importing a specific name. Otherwise, delete the column and let the system name the donation.
- Donation Record Type Name – Only put in a value if you are importing something other than “Donation”.
- Donation Stage – Only put in a value if you are importing something other than the “Closed Won” stage.
- Donation Type – This is a picklist on the opportunity object. If you’re not using it, then delete the column.
- Donation Description – You can import a description. If you are not using that field, then delete the column.
- If you use the following for membership donations, import these – otherwise, delete the column:
- Donation Member Level
- Donation Membership Start Date
- Donation Membership End Date
- Donation Membership Origin
- Campaign Name – Always associate a donation to a campaign. By putting in a value here, the system will create a campaign for you.
- Campaign Member Status – You can put in a custom status here.
- Payment Check/Reference Number – Optional. If you are not entering a value, then delete the column
- Payment Method – Optional. If you are not entering a value, then delete the column
The last template to create would be the “Household Accounts with Donations”, you would follow the same procedure. So what I would do is do a “Save As” with the template you just created for “Organizations with Donations” and then name it “Household Accounts with Donations”.
You then replace “Account1 Name” with the matching criteria you are using for your contacts/constituents, either First/Last/Email or First/Last/Phone.
In this template, Donation Donor is “Contact1.” The Donation Donor column tells the system whom to match the donation to. It’s not the name of an account or person.
For the other donation columns, it will be the same as the “Organizations with Donations”.
The bottom line: measure twice, import once
As you can see, getting your data organized first will improve your data quality in Salesforce, and save you some headaches. Although there is no “easy button” for data imports, it helps to carve out plenty of time to review and correct the CSV as many times as you need before heading into Salesforce to do the import.
The Trailblazer Blog
Discover expert insights to help you develop your career, connect with Trailblazers, learn Salesforce, and earn certifications. Explore practical how-to guidance, authentic peer perspectives, and inspiring Trailblazer stories.